W4 Mesh Converter
Scope
The W4 game engine uses its own asset storage format. Therefore, before using any fbx asset, it has to be converted. This can be done using the Mesh Converter tool that comes with the W4 SDK.
Mesh Converter converts assets from Autodesk FBX (.fbx) format. Other formats are not supported.
Technical limitations
Mesh Converter converts any fbx with the following restrictions:
Due to the hardware and software features of some popular device models, a skinned mesh may contain:
- no more than 28 bones
- no more than 8 vertices per bone
How to use
The procedure for obtaining the project repository is described in the Quick Start article. The W4MeshConverter.bin file is located in the w4framework/tools directory. The conversion is started from the command line, as described in the Short manual section and shown in the case below.
Mesh Exmple
Preparing
Let’s take the Utah teapot as an example. If you view the file using the utility Autodesk FBX Review, you will see something similar to the following figure.
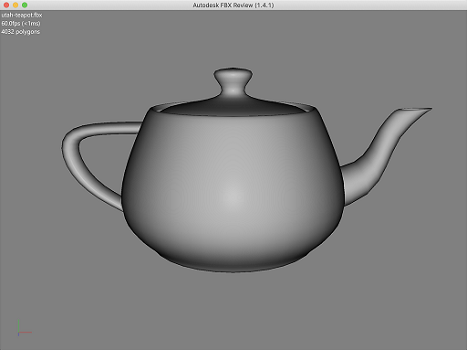
Pay attention to the orientation of the teapot spout when viewing fbx, we will get back to this later.
Converting
Copy the model file to the directory where the file W4MeshConverter.bin is located.
To convert the model to the W4 Engine format (asset), the following command are executed:
./W4MeshConverter utah-teapot.fbx teapot
As a result, the 'teapot' directory will appear containing asset data.
Adding to the project structure
To work with an asset, you need to copy its directory (in our case, it is 'teapot') into the directory 'resources' of the project. The 'resources' directory is located at the same level of the project structure as the 'sources' directory. Thus, the structure of the project becomes similar to the following:
.
└── W4TemplateGame
    ├── resources
    │   └── teapot
    │       ├── Animations
    │       ├── BoneInfo
    │       ├── Materials
    │       │   ├── defaultMaterial.matInst
    │       │   └── defaultSkinnedMaterial.matInst
    │       ├── Splines
    │       ├── teapot.asset
    │       └── VertexData
    │           ├── Utah Teapot Quads_0.ib
    │           └── Utah Teapot Quads.vb
    └── sources
        └── main.cpp
Code example
Loading:
auto asset = Asset::load(Path("resources/teapot", "teapot.asset"));
Adding to the Render:
auto cam = Render::getScreenCamera();
cam->setWorldTranslation({0.f, 0, -100.f});
Render::getRoot()->addChild(asset->getRoot());
Full source code of the example:
#include "W4Framework.h"
W4_USE_UNSTRICT_INTERFACE
class AssetSample : public w4::IGame
{
public:
    AssetSample() = default;
    ~AssetSample() = default;
    void onStart() override
    {
        auto cam = Render::getScreenCamera();
        cam->setWorldTranslation({0.f, 0, -100.f});
        auto asset = Asset::load(Path("resources/teapot", "teapot.asset"));
        Render::getRoot()->addChild(asset->getRoot());
    }
};
W4_RUN(AssetSample)
Result
As a result of execution, the same teapot is displayed, but with a slight difference.
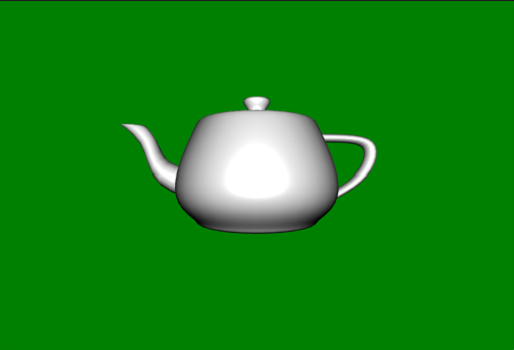
If you compare the drawings, you may notice that the spout of the teapot has changed its directed after the program execution. This happens due to differences in coordinate systems.
The FBX coordinate system Scene Axis and Unit Conversion is right-handed (with the Y pointing up), whereas W4 coordinate system is left-handed (the the Y axis is also pointing up).
Animated mesh Exmple
Working with animated meshes is not much different from the simple meshes.
Preparing
Take, for example, Rigged Hand.
If you view it using Autodesk FBX Review you will see approximately the following:
Converting
Copy the model file to the directory where the file W4MeshConverter.bin is located.
Convert the model to the W4 Engine format (asset), using the following command:
./W4MeshConverter Hand_rigged.FBX hand
As a result, the 'hand' directory appears in the current folder, containing asset data.
Adding to the project structure
To work with an asset, you need to copy its directory (in our case, it is 'hand') into the directory 'resources' of the project. The 'resources' directory is located at the same level of the project structure as the 'sources' directory. Thus, the structure of the project will become similar to the following:
.
└── W4TemplateGame
    ├── resources
    │   └── hand
    │       ├── Animations
    │       │   └── Take 001.ssa
    │       ├── BoneInfo
    │       │   ├── bone_main_hande.skeleton
    │       │   └── Hand_rigged.skin
    │       ├── hand.asset
    │       ├── Materials
    │       │   ├── defaultMaterial.matInst
    │       │   └── defaultSkinnedMaterial.matInst
    │       ├── Splines
    │       └── VertexData
    │           ├── Hand_rigged_0.ib
    │           └── Hand_rigged.vb
    └── sources
        └── main.cpp
Code example
Download asset and add it to the render tree:
 auto asset = Asset::load(Path("resources/hand", "hand.asset"));
 render::getRoot()->addChild(asset->getRoot());
If you build the project now, most probably you will not see anything, because the camera is located inside of the asset.
Move the camera away (you may need to set other values, depending on the size of the browser window, the size of the object, etc.):
 auto cam = render::getScreenCamera();
 cam->setWorldTranslation({0.f, 125.f, -300.f});
If you build the project now, a hand will appear on the screen, but it will not be animated.
Run the animator on the corresponding skinned mesh. In this case there is one skinned mesh with one animation, so in a loop the program goes through the entire asset tree and all skinned meshes in it and we play the animation (in our example - the first one):
 asset->getRoot()->traversal([&](Node& node)
 {
   if(node.is<SkinnedMesh>())
   {
     auto skinned = node.as<SkinnedMesh>();
     skinned->getAnimator(0).setIsLooped(true);
     skinned->play(0);
   }
 });
Full source code for the example:
 #include "W4Framework.h"

 W4_USE_UNSTRICT_INTERFACE

 class MeshAnimatedSample : public w4::IGame
 {
 public:
     MeshAnimatedSample() = default;

     void onStart() override
     {
         auto asset = Asset::load(Path("resources/hand", "hand.asset"));
         render::getRoot()->addChild(asset->getRoot());

         auto cam = render::getScreenCamera();
         cam->setWorldTranslation({0.f, 150.f, -300.f});

         asset->getRoot()->traversal([&](Node &node)
         {
             if (node.is<SkinnedMesh>())
             {
                 auto skinned = node.as<SkinnedMesh>();
                 skinned->getAnimator(0).setIsLooped(true);
                 skinned->play(0);
             }
         });
     }
 };

 W4_RUN(MeshAnimatedSample)
Result
As a result of the program, the following animation is shown:
http://demo.w4-dev.ciliz.com/wiki-files/Hand_engine.mov
Short manual
Basics
Convert utah-teapot.fbx to asset with the name 'asset' (current directory):
./W4MeshConverter utah-teapot.fbx
Convert utah-teapot.fbx to asset with the name 'teapot' (current directory):
./W4MeshConverter utah-teapot.fbx teapot
Convert utah-teapot.fbx to asset with the name 'teapot' which will be saved in the directory ~/some/dir:
./W4MeshConverter utah-teapot.fbx teapot ~/some/dir
Common keys
Show manual:
-h, --help
Scene statistics output:
-v, --verbose
Example of statistics:
(DEBUG) ==================== Scene statistics ====================
(DEBUG) Nodes: 2
(DEBUG) Geometries: 1
(DEBUG) Poses: 0
(DEBUG) Materials: 1
(DEBUG) Textures: 0
(DEBUG) ====================== Axis & Scale ======================
(DEBUG) Up: +Y, Front: +ParityOdd, System: RightHanded
(DEBUG) Scale: 1.000000
(DEBUG) ================ Mesh: Red_label ================
(DEBUG) Vertex count: 404
(DEBUG) Index count: 2118
(DEBUG) All polygons are triangles: 1
(DEBUG) ==========================================================
(DEBUG) create default material...
(DEBUG) create default skinned material...
Size control (scale). Where 'arg' is the value. For example (10, 1, 0.1):
--scale arg
Flip vertical axis V of texture coordinates. If the flag is specified, then a transformation 'V = 1.0 - V' applies to the texture coordinates:
--uv-flip
Setting limitations
Restrictions on the maximum number of vertices and indices can be set for all meshes. For Skinned Meshes, the limit of the maximum number of bones and the maximum number of bones per vertex can be set.
A model that does not meet the specified limitation requirements can still be converted using the flag 'force'. However, performance is not guaranteed in this case:
-f, --force
Limit of the maximum number of vertices per object, where 'arg' is the value (it is not specified by default):
--max-vertex arg
Limit of the maximum number of indices per object, where 'arg' is the value (it is not specified by default):
--max-index arg
Limit of the maximum number of bones for Skinned Mesh, where 'arg' is value (28 by default). If the value is set higher than the default, operability is not guaranteed:
--max-bones arg
Limit of the maximum number of bones per vertex for Skinned Mesh, where 'arg' is the value (8 by default). If the value is set higher than the default, operability is not guaranteed:
--max-bones-per-vertex arg